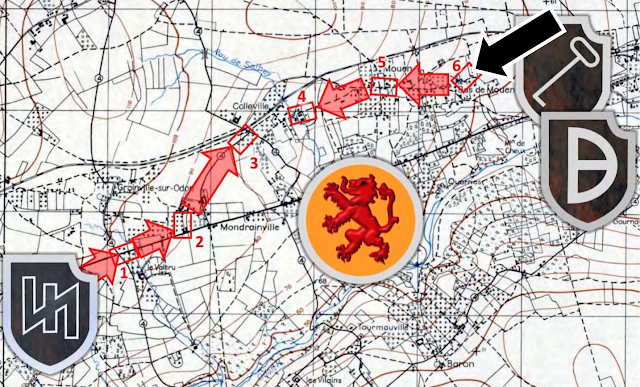
Probe at Bas de Mouen, 07:00
In the first battle of the Scottish Corridor campaign Kampgruppe Frey attacks from the east towards the village of Bas de Mouen (rung 6 on the campaign map). The German panzer grenadier platoon, led by 22 year old Obersturmführer Eric Böhm, are supported by a Tiger, a second Senior Leader, a sniper and and adjutant, all in all 16 support points.
German planning and support
The German plan is to race the Tiger along the road past the centre farmhouse and then take a left turn into the orchard and towards the table edge, thus avoiding getting bogged down crossing hedges and getting some concealment from the orchards. Meanwhile, the grenadiers will put pressure on the British Jump Off Points in order to lock up British troops and be in position for a more generalized frontal assault in case the Tiger fails its mission.
British planning and support
Patrol Phase
The Germans deploy their Jump Off Points concentrated on their right flank.
The British deploy in depth along the road, reaching as far as the centre farmhouse.
Ignore the German symbol by the road and the British on the dotted line, those are where the Patrols start.
Battle
Both the Germans and the British start with a cautious Force Morale of 8.
Much to the Germans surprise, the battle starts with a British Stuart entering the road and starting to speed towards the German end of the table!
The germans deploy a squad and a Senior Leader.
The britts deploy a squad in the central farmhouse from their foremost JOP. The Stuart continues at full speed and makes a left turn into the open field and towards the closest German JOP.
The Germans advance towards the infantry in the centre farmhouse, throwing 2 smoke grenades to screen themselves.
The British now roll a Double Phase and se the opportunity to go on the offensive. A flurry of hand grenades greet the Germans as the British deploy another squad along the hedge surrounding the farmhouse. The squad inside the house also moves out and takes positions along the hedge, read to ”go over the top” if necessary. The Germans take two casualties and 7 shock, pinning the squad!
Capitalising on a their Double Phase, the British next charge over the hedge and assault the pinned German squad. The German squad is wiped out, only the squad leader escapes carrying the unconscious Senior Leader on his shoulder.
The German command dice doesn’t allow for much maneuvering but quickly builds towards their first Chain of Command Dice. A sniper deploys but misses the britts in plain sight, continuing a long standing tradition of snipers delivering disappointment…
The British infantry move across the road towards the next building and the rather tightly grouped German Jump Off Points. The Stuart almost reaches the closet German JOP in the field, closing it down.
The Germans deploy another squad to protect the two dangerously exposed leaders that survived the assault. Next, the Germans use their Chain of Command Dice to ambush the Stuart, knocking it out with a Panzerfaust. The tank is destroyed but the crew are able to dismount and escape to safety.
The Germans deploy the Tiger along the new infantry squad.
The British infantry regroup along the road.
Supported by the Tiger, the German infantry brings along the Senior Leader who have now regained consciousness and advance towards the centre farmhouse and take positions along the hedge from where the britts assaulted earlier. As the Germans advance, both British squads regroup along the edge of the orchard on the other side of the centre farmhouse. The britts deploy a third infantry squad with the Bren-team in en entrenchment to support the other two and a standoff across the open ground around the centre farmhouse follows.
After some back and forth with both sides trying what little room for maneuver they have to gain an upper hand, the positions remains pretty much unchanged. In the close and confused fighting around the farmhouse one of the German Junior Leaders is killed. The Tiger commander eventually has enough, crossing the hedge and starting to make his way into the orchard. At this point the British commander assessed the situation untenable and orders a withdrawal.
After the Battle
The Germans
A victory for the Germans at the cost of four men and one Junior Leader killed. The German CO:s opinion goes from 0 to +1. The loss af the Junior Leader however brings the mens opinion from 0 to -2. The commanders mood changes from relaxed to cheerful.


Comments
Post a Comment